

Virtual machines (VMs) are rapidly becoming a critical part of many organisations infrastructure. This technology is being adopted by organizations of all sizes and reaping a variety of benefits throughout their operations such as providing more efficient, cost-effective ways to reduce downtime, gain IT productivity, increase hardware savings and so much more. As the VMware ESX platform is loaded directly on hardware and is its own virtualization operating system, there are a number of factors to consider when securing it. While, due to its design architecture, ESX is inherently secure, there are still a number of security factors to consider and virtual machines are vulnerable to most of the same things as physical machines including data loss/corruption, hardware failures, viruses, and hackers.
Most organisations will implement a VMware vSphere solution with default configurations and standard features. Once deployed, many vSphere implementations are not regularly evaluated to determine potential weaknesses or improvements that can be made in terms of performance or security. While the defaults provide partially hardened settings, there are many ways to improve upon them.
In this article, we will cover some VMware security best practices that you can follow that can help protect your VMware infrastructure against cybersecurity threats, including both malicious attacks and careless mistakes.
Isolate the Host Network
The most important step in securing your VMware environment is to isolate the host machine’s network by using a different network range from the one you will use for your VMs. Because the VMs and the host machine can share the same physical network adapters, it’s important to prevent attackers from gaining access to the network traffic of other VMs on the same host. The best way to do this is to have the host machine’s network adapter connected to an isolated and dedicated management network. This will ensure only trusted users can access the system.
Use the built in ESXi firewall
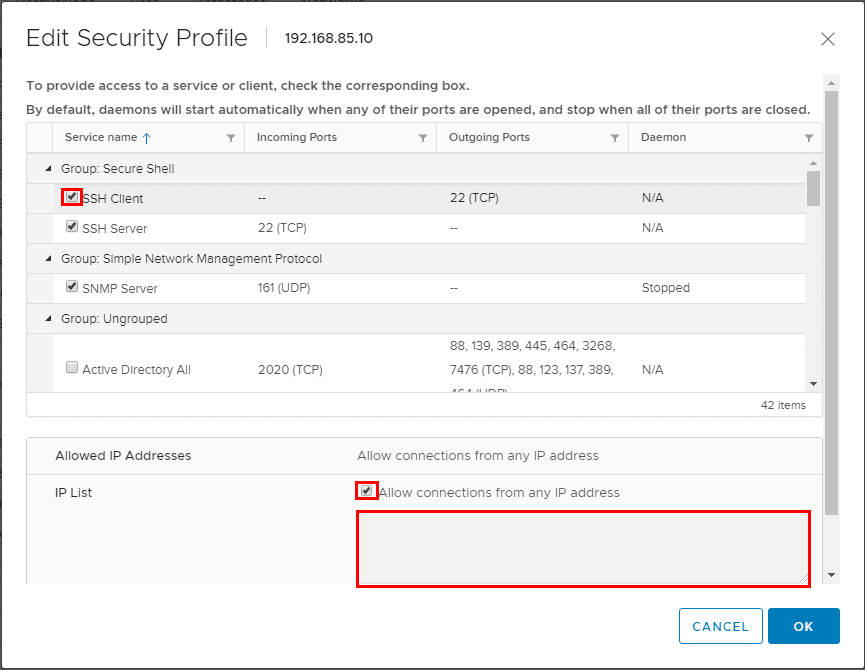
The ESX Server has a built-in firewall and is enabled by default however, many admins will either not know that this existed or prefer not to deal with configuring another firewall. The VMware ESXi host firewall is a pretty powerful means of scoping down access to various services, disabling services, and configuring services and their access. You should check to ensure that your ESX Server firewalls are enabled and see what ports are currently allowed through. To do this in VC, go to Configuration -> Security Profile.
By using the “checkboxes” to the left of each service, you can quickly enable or disable services and their ports “poked through” the firewall. Also, you can set the Allowed IP Addresses that are able to connect to each service port. By default, the Allow connections from any IP address is selected. If you deselect this checkbox, you can specify specific IP addresses that are able to connect to a particular service. These can be in the form of subnets, IPs, etc. You can comma separate them.
Secure Remote Access Consoles
When connecting to VMware Server remotely, the SSL protocol is used by default. You may be thinking that SSL is secure enough in this scenario, however, it only uses a self-signed certificate. Although a self-signed certificate supports traffic encryption, it doesn’t provide any protection from man-in-the-middle attacks. (These attacks are perpetrated by unauthorized users who obtain access to files without the knowledge of authorized users on the host or guest machines.) To block these and other attacks, you should obtain a certificate signed by a Certificate Authority (CA) which is much more secure.
Limit Local Logons on Host
Restricting access to the VMware Server host machine is the most important step in securing your VM environment. If you create user accounts to allow remote access to your guest VMs, make sure that you adjust any Group Policy (GP) settings to deny local logons from these users. The easiest way to restrict access is to create a group for nonadministrator users of VMs and use a group policy to deny this group local logons.
Make sure that you are up to date
You not only need to make sure that your guest OS operating systems are up to date on important Microsoft security patches but you will also need to ensure that you keep VMWare ESXi hosts up to date with its latest security patches.
Encrypt Virtual Drives
Any malicious user that is successful in gaining access to the physical host machine can potentially mount virtual hard drives and bypass the guest OS security mechanisms. One way to mitigate this risk is to implement disk encryption on the guest OS.
Microsoft’s Encrypting File System (EFS) is a good solution for protecting data, but it won’t protect the OS itself. Full-disk encryption technologies, such as Microsoft’s BitLocker Drive Encryption in Windows Vista or PGP Whole Disk Encryption, will protect the entire guest OS. By encrypting the entire virtual drive, you eliminate potential threats from others having access to the host machine. See the Learning Path for more information about encryption solutions.
Turn off Host and Guest Interaction
It’s important to isolate the host and guest from each other by preventing any interaction between the two. While we know that access to a host system can easily lead to access to any guest VMs, going the other way is much more difficult, but it can be done.
Because VMware allows you to map folders between the guest and host OSs, someone could potentially bypass security or network controls you might have in place. VMware lets you share a folder on the host machine that a guest OS can directly access without being subject to the controls the OS would encounter if trying to access the same folder over the network. The same potential for misuse exists when settings permit copy and paste and drag and drop between host and guest.
To disable these features on all VMs and the host, you can edit the global config.ini file on each VM and on the host. In Windows Server 2003 and Windows XP, this file is located in C:\Documents and Settings\All Users\Application Data\VMware\VMware Server. In Vista, you can find it in C:\ProgramData\VMware\VMware Server.
Open config.ini in any text editor and add the following lines:
isolation.tools.hgfs.disable = "true"
isolation.tools.dnd.disable = "true"
isolation.tools.copy.enable = "false"
isolation.tools.paste.enabled = "false"
Save the file, and the settings will take effect the next time you restart VMware.
Take Sensitive VMs Offline
One benefit of VMs is the ability to easily take a system offline. You might have a VM that’s so sensitive that you want to bring it online only for certain tasks. For example, you might have a root certificate server for your organization. To protect a sensitive machine like this, run it from a removable hard disk. When you’re finished with the machine, take the disk offline and physically lock it up.
Just be sure to bring the machine online once a month to get the latest patches.
Use Startup Passwords
If possible, use startup passwords to prevent unauthorized users from accessing sensitive VMs. VMware allows you to set a BIOS password that must be entered at boot time. To set a BIOS password, press F2 on your keyboard as the VM starts up. Once in the BIOS setup utility, use the arrow keys to navigate to the Security menu, then to the Set User Password option. Set a new password, then scroll down to the Password on boot option and set it to Enabled. Press F10 to save your changes and exit.
Another way to prevent an unauthorized user from booting a Windows VM is to password-protect the system key on the guest OS. To do this, select Run from the Start menu and type syskey.exe. In the Securing the Windows Account dialogue box, click the Update button to open the dialogue box. Select the Password Startup option, and enter a password.
Disable Scripting in the Guest OSs
VMware has the ability to run scripts in the guest OS when you start and stop a machine. Although scripts are sometimes necessary (e.g., for startup and shutdown), you should always disable scripting if you aren’t specifically using it.
To completely disable scripting for a VM, open the .vmx file for the VM in a text editor and add the following lines:
toolScripts.afterPowerOn = "false"
toolScripts.afterResume = "false"
toolScripts.beforePowerOff = "false"
toolScripts.beforeSuspend = "false"
Save the file and scripts will no longer run.
If you do use startup and shutdown scripts, be sure to set strict permissions on each of the files so that no one else can modify them. When these scripts run, they run in the context of the local system account.
Another dangerous aspect of scripting is that VMware provides an API to automate tasks on VMs. The API allows any script on the host machine to run commands on a guest machine by using the credentials of the user currently logged on at the console. To turn off this feature, you can edit a VM’s .vmx file in a text editor, adding the following statement (all on one line):
guest.commands.anonGuestCommands
 RunAsConsoleUser="FALSE"
Use vCenter Server Password Policy and Lockout Behavior
Make use of the vCenter Single Sign-On password policy, vCenter Server passwords, and lockout behavior.
For vCenter Single Sign-On Administrator Password by default is configured according to the following requirements:
- At least 8 characters
- At least one lowercase character
- At least one numeric character
- At least one special character
With vCenter Server, the password policy is defined by the configured identity source such as Active Directory or by the Single sign-on policy.
Make use of lockout policy where the user account is locked after the preset number of failed login attempts. This is configured by default to be five consecutive failed attempts in three minutes and a locked account is unlocked after five minutes.
Conclusion
Securing your virtualized environment is a complicated task. Following the best practices detailed here to design, configure and monitor your environment will take you a long way toward reducing risk and ensuring regulatory compliance.